For a long time, I’ve been using kickstart scripts (link to GitHub repo) to set up Fedora and CentOS virtual machines on a XenServer host. In the last year or so, the trend of cloud computing has led distributions to release prebuilt “cloud” images in OpenStack-compatible qcow2 or raw disk format, which happen to be broadly compatible with hypervisors. Fedora Cloud’s introduction with F21 prompted me to look into ways of using cloud-init/cloud-config without an entire private cloud infrastructure.
It should no longer be necessary to use a kickstart to install a new VM, because the distribution’s prebuilt images easily work on XenServer with a few conversions.
(Kickstart scripts remain useful for customizing an image, of course; they are often the mechanism with which Linux distros build such images.)
What are prebuilt images?
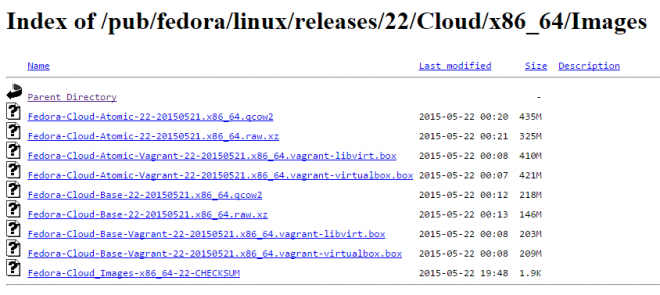
When I say “prebuilt images”, I mean VM hard disk files released by the Linux distribution. For instance, Fedora 22’s Cloud Base and Atomic Host images are provided in qcow2 and xz’d raw files:
These releases are designed to work in actual cloud infrastructure—meaning a compute hypervisor (usually KVM), a metadata service that supplies configuration like hostname and networking at boot time, and some APIs that can programmatically affect the virtual machine’s behaviour and configuration. OpenStack is the leading example.
But OpenStack is overkill when you’re just virtualizing a handful of VMs. You don’t need a private cloud when you’re not running a cluster or spinning up machines programmatically. That’s exactly why I found myself running XenServer.
Nonetheless, unless you’re using Xen full paravirtualization (which there are now good reasons to avoid), these images should broadly work with all major hypervisors: QEMU-KVM, VirtualBox, Xen PVHVM, VMware, etc… with minor format tweaks.
How to convert a prebuilt image for use in XenServer
Broadly, there are three steps in the process, the first of which is most important:
- Convert qcow2 disk image to VHD.
- Import VHD in XenCenter.
- Customize imported machine and convert to template.
You can optionally also export the template to an XVA file.
1. Convert qcow2 to VHD
The qemu-img utility can do this. Use your package manager of choice to install (e.g. yum install qemu-img or dnf install qemu-img on F22+). You should do this on another Linux machine (even a VM is okay), because messing with the Xen dom0 is not recommended.
Locate your downloaded *.qcow2 file, which might look something like Fedora-Cloud-Base-22-20150521.x86_64.qcow2. If it’s compressed, like CentOS-Atomic-Host-7.1.2-GenericCloud.qcow2.xz, decompress it first.
Use the command $ qemu-img convert -f qcow2 -O vpc [input file] [output file] to do the conversion. For example,
$ qemu-img convert -f qcow2 -O vpc Fedora-Cloud-Base-22-20150521.x86_64.qcow2 Fedora-Cloud-Base-22-20150521.x86_64.vhd
2. Import the new VHD
If you have XenCenter installed on Windows, use the File -> Import… option to load the VHD. Follow the prompts to set up the VM’s CPU, memory, storage, and networking allocations.
Manual import on command line
Ugh, not using the UI? That means a whole lot more work to import. Are you sure about this???
If you do not have access to XenCenter, it’s a more involved process.
Transfer the newly converted disk image to the hypervisor dom0, such as by copying it into a shared storage location (e.g. NFS image library), and you should be able to use xe vdi-import to load the VHD:
First, get the size of the disk image with $ qemu-img info [VHD file]. Note the size in bytes.
$ qemu-img info Fedora-Cloud-Base-22-20150521.x86_64.vhd
image: Fedora-Cloud-Base-22-20150521.x86_64.vhd
file format: vpc
virtual size: 3.0G (3221471232 bytes)
disk size: 516M
cluster_size: 2097152
Create a VDI in XenServer using the command line tool to hold this new data:
# set SIZE to size in bytes, e.g.
$ SIZE=3221471232
# set SR to the UUID of a storage repository in which to store the VDI
$ SR=$(xe sr-list name-label='NFS virtual disk storage' --minimal)
$ UUID=$(xe vdi-create name-label=Fedora-Cloud-Base-22-20150521.x86_64 virtual-size=$SIZE sr-uuid=$SR type=user)
Then load the VHD:
$ xe vdi-import uuid=$UUID filename=Fedora-Cloud-Base-22-20150521.x86_64.vhd format=vhd --progress
If all has gone well, you get output to the effect of
[|] ######################################################> (100% ETA 00:00:00)
Total time: 00:00:24
You can check that it’s there by doing
$ xe vdi-list uuid=$UUID
It’s time to make a VM (important: must be PVHVM) to which to attach this VHD. You’ll need to create the CD drive, set up networking, etc, all on the command line. The CD drive should be installed with a cloud-init/cloud-config datasource. (Aren’t you regretting not using the GUI now?)
$ VM=$(xe vm-install new-name-label=Fedora-Cloud-Base-22-20150521 template='Other install media')
# make an optical drive, which you might need for cloud-init
$ xe vm-cd-add cd-name='cloud-init-example.iso' vm=$VM device=3

# get the list of networks and their UUIDs; select one
$ xe network-list
# the following line is an example
$ xe vif-create network-uuid=b4187ad6-916e-d1d4-90a7-2b7f1353bca2 vm-uuid=$VM device=0
Now, create the virtual block device (VBD) that associates the VHD disk image with the VM.
$ VBD=$(xe vbd-create vm-uuid=$VM device=0 vdi-uuid=$UUID bootable=true mode=RW type=Disk)
The VM is now ready (although you’ll need to adjust CPU and RAM, which is outside the scope of this guide), either to be booted or to be stored as a template!
3. Customize and convert to template
I like to convert the now-ready VM to a template before using it for anything. This makes it a lot easier to deploy from this point onward. It’s also helpful to tweak the default CPU/memory parameters if desired.
When it’s ready, you can select a halted VM, and choose VM -> Convert to Template… in XenCenter. The equivalent for the xe CLI is something I haven’t figured out yet; the process might require taking a snapshot, and copying the snapshot to become a template.


2 Replies to “Using OpenStack images on XenServer – Fedora 22, CentOS 7”
Comments are closed.