Paravirtualized CentOS 7 and Ubuntu 14.04 on XenServer

Update (2015-10-21): since the images below have not been updated since July 2014, I highly recommend that you no longer use them; instead, you should use a kickstart script to install from the latest packages. Also, as I’ve noted in the comments, PVHVM will likely perform better overall. Update (2017-04-28): the .xva files have now been deleted; instead see this new guide for converting .qcow2 cloud images for use with XenServer.

One of the most frequently visited blog posts on my site is a guide to installing paravirtualized Fedora 20 on XenServer using an automated kickstart file. With the recent releases of RedHat Enterprise Linux 7 (and the corresponding CentOS 7 — versioned at 7.0.1406) and Ubuntu 14.04 LTS “Trusty Tahr”, as well as prerelease versions of the next iteration of XenServer, I thought it was time to revisit this matter and show you the scripts for optimized paravirtualized guests running the newest versions of CentOS and Ubuntu.

Table of Contents

  1. Prebuilt images
  2. OpenStack gripes
  3. XenServer version differences
  4. Kickstart scripts
    1. CentOS 7
    2. Ubuntu 14.04
  5. Installation instructions
    1. CentOS 7
    2. Ubuntu 14.04

Prebuilt images for the lazy

If you’re lazy, you can skip the process and download prebuilt XenServer images that you can decompress (xz -d ___.xvz.xz or use your GUI of choice) then import through XenCenter (File – Import…) or the command line (xe vm-import filename=___.xva). These images do not have XenServer Tools installed, because you should install them yourself using the tools that match your XenServer version.

These images are provided with no guarantees. Please let me know (comments below are fine) if you find an issue with them.

  • CentOS 7.0.1406 (as of 2014-07-16)
    Filename: centos-7.0.1406-20140716-template.xva.xz
    Size: 322 MB xz-compressed; 1.6 GB decompressed
    Specs: 2 vCPUs, 2 GB RAM, 8 GB disk without swap, installed software
    SHA256 hash: ab69ee14476120f88ac2f404d7584ebb29f9b38bdf624f1ae123bb45a9f1ed94
    MD5 hash: 91e3ce39790b0251f1a1fdfec2d9bef0
    Username: centos
    Password: Asdfqwerty
  • Ubuntu 14.04 LTS (as of 2014-07-16)
    Filename: ubuntu-14.04-20140716-template.xva.xz
    Size: 549 MB xz-compressed; 1.9 GB decompressed
    Specs: 2 vCPUs, 2 GB RAM, 8 GB disk including 1 GB swap, installed software
    SHA256 hash: 1c691324d4e851df9131b6d3e4a081da3a6aee35959ed3defc7f831ead9b40f2
    MD5 hash: e2ed6cfb629f916b9af047a05f8a192d
    Username: ubuntu
    Password: Asdfqwerty

Side note on OpenStack

It’s true that private cloud IaaS tools like OpenStack have been growing in popularity, and increasingly, vendors are distributing cloud images suitable for OpenStack (see Fedora Cloud images). My instructions in the rest of this blog post won’t help you build images for an IaaS platform. You might as well just get the vendor cloud images if you’re going to be using OpenStack.

You can skip down to the next heading if you don’t want to read about my experiences with OpenStack.

OpenStack isn’t right for everyone

I tested out OpenStack + KVM on an HP baremetal server with 12 physical cores and 48 GB of RAM recently. Despite the simplified installation process enabled by RedHat, it didn’t fit my needs, and I went back to using XenServer. OpenStack was a mismatch for my needs and also has a few infrastructural problems, and hopefully someone reading this will be able to tell me if I’m out of my mind or if these are actually legitimate concerns:

  • Size of deployment. Even though it can be used on a single baremetal server, OpenStack is optimal for deployments involving larger private clouds with many servers. When working with a single host, the complexity wasn’t worth my time. This is where admins need to judge whether they fall on the virtualization side or the cloud side of a very blurry line.
  • Complex networking. Networking in OpenStack using Neutron follows an EC2 model with floating IPs, though there are various “flat” options that will more simply bridge virtual networks. The floating IP model is poorly suited to situations when the public Internet-routable network has an existing external DHCP infrastructure, and no IPs or IP ranges can be reserved.
  • Abstraction. From what I could tell, there were ridiculous levels of abstraction. On a single-host node that hosts the block storage service (Cinder) as well as the virtualization host (Nova), an LVM logical volume created by Cinder would be shared as an iSCSI target, mounted by the same machine, and only then exposed to qemu-kvm by the Nova compute service.
  • Resource overhead. The way that packstack deployed the software on a CentOS 7 server placed OpenStack—compute service (Nova), block storage (Cinder), object storage (Swift), image storage (Glance), networking (Neutron), identity service (Keystone), and control panel (Horizon)—and all its dependency components—MariaDB, RabbitMQ, memcache, Apache httpd, KVM hypervisor, Open vSwitch, and whatever else I’m forgetting—on the nonvirtualized baremetal operating system. That’s a ton of services, and attack surface, for the host… And the worst part: because each of those programs realized that the server has 48 GB of physical RAM, they all helped themselves to as much as they could grab. MariaDB was configured automatically with huge memory buffers; RabbitMQ seemed to claim more than 3 GB of virtual memory. By the time any virtual guests had been started up, the baremetal system was reporting at least 7-9 GB of used RAM!

That’s when I had enough. Technical benefits of KVM aside, and management capabilities of OpenStack aside, I decided to move firmly back into virtualization territory. XenServer’s minimal dom0 design and light overhead was much more suitable for my needs.

Note your XenServer version

XenServer Creedence requires no fixes

XenServer Creedence alpha 4—the most recent prerelease version that I am using—uses a newer Xen hypervisor and bundled tools. Consequently, it seems to have a patched version of pygrub that can read the CentOS 7 grub.cfg, which uses the keywords linux16 and initrd16, and which is no longer affected by the same parsing bugs on default="${next_entry}" that necessitated the fixes at the end of the post-installation script.

Fixes needed by XenServer 6.2

However, XenServer 6.2 cannot handle the out-of-box installation (ext4 /boot partition, GPT, etc) under paravirtualization without additional customization. Kickstart scripts are still the easiest way to ensure that the guests are bootable out of the box, by predefining a working partition scheme, selecting a minimal package set, fixing the bootloader script, and generalizing the installation.

Additionally, XenServer 6.2 lacks a compatible built-in template for Ubuntu 14.04. Thus, it cannot use netboot to install 14.04; you must use the 14.04 server ISO image to install.

The scripts to do it yourself

CentOS 7

I determined that the true minimal @core installation is too minimal for typical needs (it doesn’t come with bind-utils, lsof, zip, etc) so this image is installed with the @base group. About 456 packages are included.

[github file=”/frederickding/xenserver-kickstart/blob/develop/centos-7.0/cent70-server.ks”]

Ubuntu 14.04:

[github file=”/frederickding/xenserver-kickstart/blob/develop/ubuntu-14.04/trusty-server.ks”]

The process to do it yourself

CentOS 7

  1. Use the CentOS 6 template for a baseline.
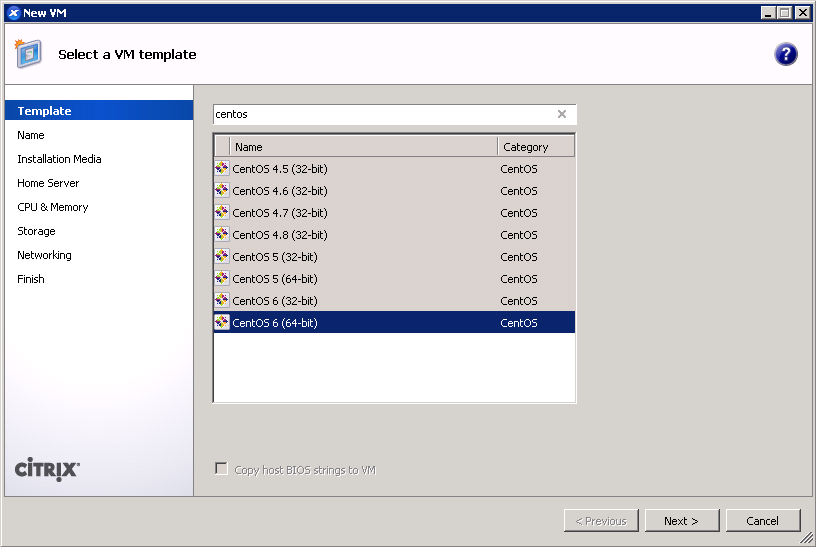
    XenCenter add VM wizard - CentOS 6 template
  2. Give your VM a name. (screenshot)
  3. IMPORTANT: Boot up a CentOS 7 installer with parameters. You can use the netboot ISO, or boot directly from an HTTP mirror (e.g. http://mirror.rackspace.com/CentOS/7.0.1406/os/x86_64/). This is also the screen where you specify the boot parameters:
    console=hvc0 utf8 nogpt noipv6 ks=https://github.com/frederickding/xenserver-kickstart/raw/develop/centos-7.0/cent70-server.ks
    Note: you may have to host the kickstart script on your own HTTP server, since occasional issues, possibly SSL-related, have been observed with netboot installers being unable to fetch the raw file through GitHub.
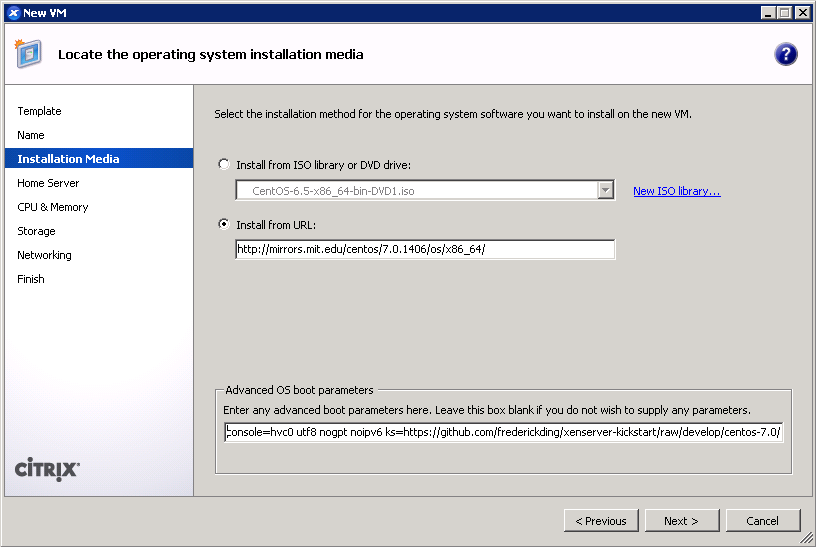
    Installing CentOS 7 with a URL to boot from
  4. Set a host server. (screenshot)
  5. Assign vCPUs and RAM; Anaconda demands around 1 GB of memory when no swap partition is defined. (screenshot)
  6. Create a primary disk for the guest. Realistically, you need only 1-2 GB for the base installation, but XenServer may force you to set a minimum of 8 GB. No matter what size you set here, the kickstart script will make the root partition fill the free space. (screenshot)
  7. IMPORTANT: Configure networking for the guest. It’s critical that this works out of the box (i.e. DHCP), since the script asks Anaconda to download packages from the HTTP repositories. (screenshot)
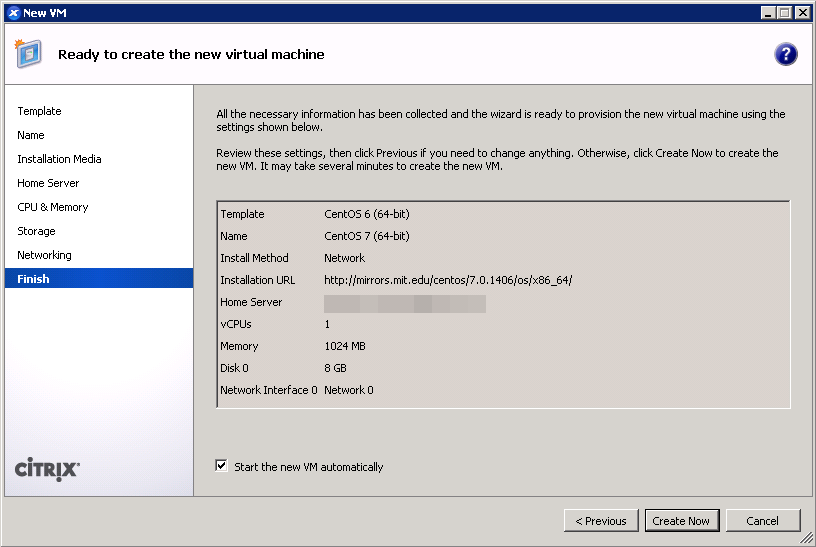
  8. Finish the wizard and boot up the VM.
    Ready to boot up the installer
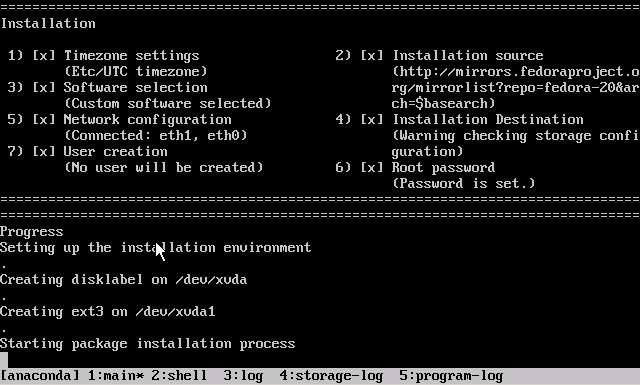
  9. The VM will boot into the CentOS 7 installer, which will run without interaction until it completes.
  10. Press <Enter> to halt the machine. At this point, you can remove the ISO (if any).
  11. Boot up the VM. It should go right into the login screen on the command line — from which you can do further configuration as needed.
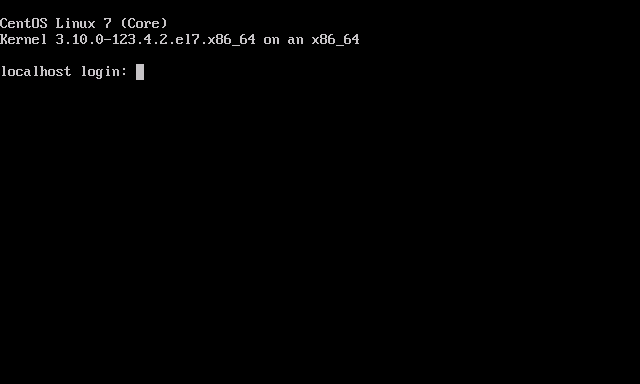
    Paravirtualized CentOS 7 installed in XenServer

Ubuntu 14.04

As mentioned above, this process will differ slightly if you are on XenServer 6.2 or older.

  1. On XenServer Creedence: Use the Ubuntu 14.04 template.
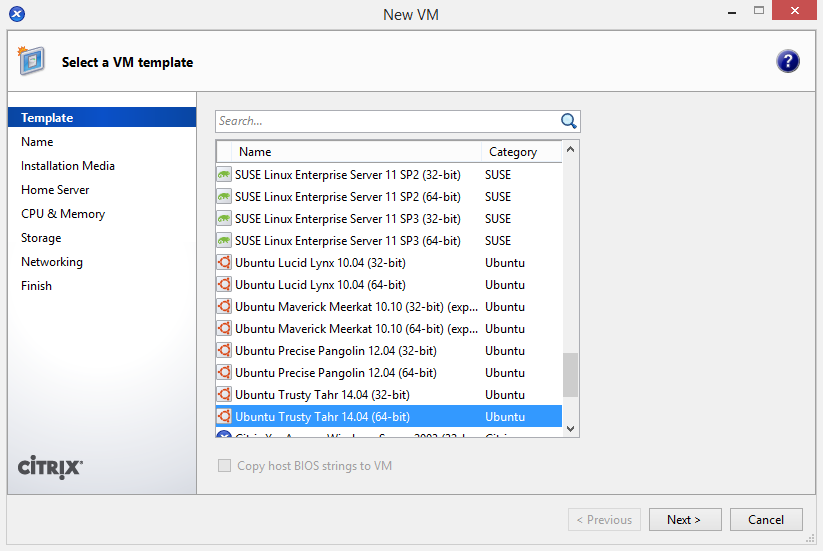
    XenCenter add VM wizard - Ubuntu 14.04 templateOn XenServer 6.2 or older: Use the Ubuntu 12.04 template for a baseline.
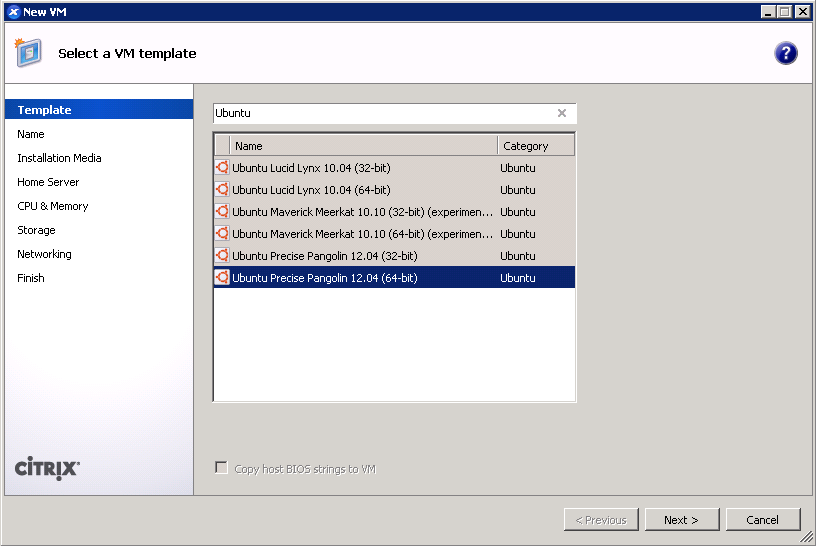
    XenCenter add VM wizard - Ubuntu 12.04 template
  2. Give your VM a name. (screenshot)
  3. IMPORTANT: On any version of XenServer: Boot up the 14.04 server ISO installer with parameters. You cannot use the netboot ISO.
    On XenServer Creedence only: You can boot from an HTTP mirror, such as http://us.archive.ubuntu.com/ubuntu/.
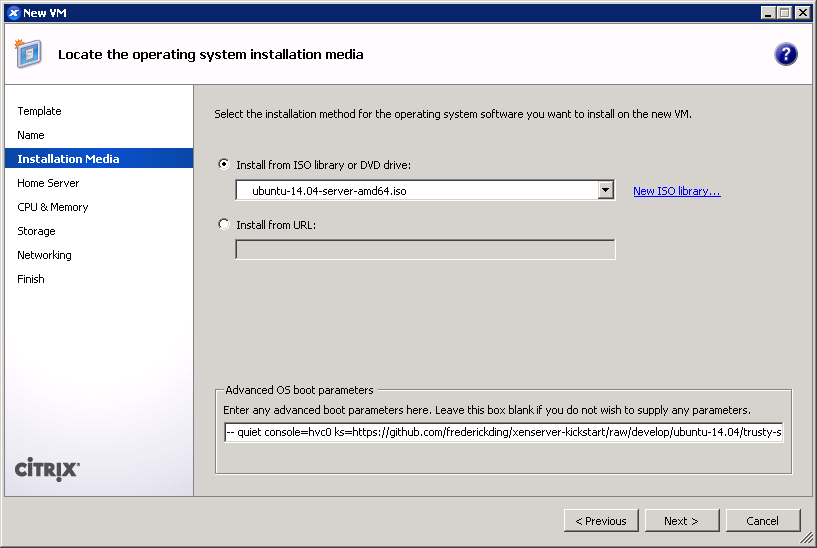
    Installing Ubuntu 14.04 requires the server ISOThis is also the screen where you specify the boot parameters: append ks=https://github.com/frederickding/xenserver-kickstart/raw/develop/ubuntu-14.04/trusty-server.ks to the existing parameters line.
    Note: you may have to host the kickstart script on your own HTTP server, since issues, possibly SSL-related, have been observed with netboot installers being unable to fetch the raw file through GitHub.
  4. Set a host server.
  5. Assign vCPUs and RAM.
  6. Create a primary disk for the guest. Realistically, you need only about 2 GB for the base installation, but XenServer may force you to set a minimum of 8 GB. No matter what size you set here, the kickstart script will make the root partition fill the free space.
  7. IMPORTANT: Configure networking for the guest. It’s critical that this works out of the box (i.e. DHCP), since the script asks the installer to download packages from online repositories.
  8. Finish the wizard and boot up the VM.
  9. The VM will boot into the Ubuntu installer, which will run without interaction until it completes.

    Note: if you are warned that Grub is not being installed, you should nevertheless safely proceed with installation.

  10. Press <Enter> to halt the machine. At this point, you can remove the ISO (if any).
  11. Boot up the VM. It should go right into the login screen on the command line — from which you can do further configuration as needed, such as installing XenServer Tools.

Final thoughts

I recognize that these instructions require the use of a Windows program—XenCenter. I have not tried to conduct this installation using command line tools only. If you are a users without access to a Windows machine from which to run XenCenter, you can nevertheless deploy the kickstart-built XVA images above using nothing more than 2 or 3 commands on the dom0. If anyone can come up with a process to run through a kickstart-scripted installation using the xe shell tools, please feel free to share in the comments below.

I hope this has helped! I welcome your feedback.

What’s wrong with the Internet?

I just have a lot of feelings, from Mean Girls

BuzzFeed is not known to be a shining beacon of quality journalism. It has a reputation for link-bait headlines (“38 Crazy Things You Never Knew About Kangaroos”) leading to GIF-laden lists. It publishes quizzes (answer a bunch of seemingly random questions before a script shows you the logical conclusion of your answers) so unscientific that no one should ever take them seriously for big life decisions.

BuzzFeed thrives on the short attention span of Generation Z—children born into an age when they can expect news to be spoonfed to them in bullet points and images.

I just have a lot of feelings, from Mean Girls
… how could long walls of text about important things ever compete with simple GIFs worth a thousand words?

The people behind The Onion certainly saw right through this. They recently launched “ClickHole — Because all content deserves to go viral”, to parody both BuzzFeed and every other content-aggregating website that feeds on social media frenzies. (Worth mentioning: ClickHole parodies far more than BuzzFeed itself; it even incorporates references to Upworthy, the feel-good viral-video site with a cloying habit of telling you what to think about its clips before you’ve even watched them.”)

ClickHole, the Onion's parody of viral content
ClickHole, the Onion’s parody of viral content

But BuzzFeed has also published some high-quality longform pieces, dubbed BuzzReads. These are serious articles that cover the entire spectrum of subject matter, from politics, to technology, to rape and social justice. They’re of sufficient quality that they could easily pass for an extended newspaper exposé or magazine centrepiece. Targeting a more mature audience seeking longer reads, these feature stories often carry the same socially-liberal perspectives espoused by the rest of the site, while employing words more eloquent than their pop-culture GIFs could ever be.

I’ve had my doubts that BuzzFeed can sell itself in both markets. As great as the quality of their content may be, and as awesome as their access to reliable sources might be (the site has a DC operation with press pass access), it’s hard to “[break] down the divide between the light and the serious.” It’s a challenge the site’s editors realize:

“I think we need to show people that it’s up to us to write it in a way that has the context, has a compelling narrative to it. If you give them more of this and mix it in with fluff, and it’s treated equally by the publication, the public will start to treat it the same way too.”

Two years later, I think they’re starting to make some headway, at least among the social media users who are more publishers than consumers. People are sharing BuzzFeed’s longform essays on social media, using the site’s content to express beautifully the thoughts they could not write themselves.

What’s the reception like? I think many people on the consuming end of content are still sometimes skeptical. And I’m not sure that many people associate BuzzFeed sufficiently with quality content that they would be willing even to give reading BuzzReads a chance.

Case in point? This ignorant comment posted by a BuzzFeed reader on a post about the termination of American Apparel CEO, Dov Charney.

People don't like serious BuzzFeed
Apparently some people don’t like BuzzFeed getting serious.

That article wasn’t even a longform essay. BuzzFeed had, through an anonymous leak, obtained an exclusive copy of the CEO’s termination letter, which no other news outlet reportedly had done. It was news, and it was worldly.

Apparently too worldly for this one commenter, who seems to think that only funny, entertaining, and “pertinent” (whatever that means in this context) content deserves to be published on a site from which they expect only entertainment.

I would be a fool to equate this one person’s opinion with everyone else’s. However, this is merely one example of the derisive attitude towards long online content I’ve witnessed first-hand—scroll through my Facebook timeline, or my friends’, and you will certainly find that GIFs and short interactive quizzes get more likes and click-throughs than essays about anything.

Why is that? It’s not like everyone is working 18-hour days in finance… Why don’t we, college students and young professionals, seem to have time for intellectual engagement outside of the classroom, on the Internet?

Old lady learns about the Internet from Orange is the New Black
An old prisoner learns about the Internet. From Orange is the New Black, season 2.

This old lady learns about the Internet for the first time, in Orange is the New Black—my newest favourite show. “But people are still stupid, right?” Indeed, the very technologies that made information so much easier to access, also made it easier to seek information in the shortest tidbits possible. Why read an entire screen of text, if you can get the essentials in 10 animated images?

There’s something deeply disturbing about this trend. It’s different—markedly different—from high school classes recognizing comic books as valid literature. This is a trend that makes education and self-expression more difficult, and less valuable in the eyes of this generation.

Media in our technological age must seek not only to earn pageviews, but also spark deep, insightful conversations about important contemporary issues. Instead of stooping to the lowest common denominator, as BuzzFeed seems to have done in its early launch, they have to champion the cause of literacy and engagement.

Why are genuine discussions about ethnic conflict or self-determination (indeed, a late-night discussion I’ve had quite a few times this week with my friends) outside of the academic environment so rare? Maybe, in part, it’s because of the Internet we consume.

Installing Fedora 20 as a paravirtualized guest in XenServer with kickstart

Anaconda beginning installation of Fedora 20 in XenServer

Updated 2014-07-13 with corrected links to develop-branch version and GitHub’s new user content domain name.

Updated 2014-07-17: see this newer blog post for instructions, kickstart scripts, and prebuilt images for CentOS 7 and Ubuntu 14.04.

Backstory

Earlier this year, I installed Xen Cloud Platform (XCP) 1.6 on an off-lease Dell CS24-TY with two quad-core Intel Xeon CPUs and 72 GB of RAM. (Those machines are sold by Dell Financial Services and on eBay for unbelievably low prices, for previous generation servers of such capability.) When Citrix open-sourced XenServer, I decided to upgrade XCP 1.6 to the full-featured XenServer 6.2.0 SP1, which added a few formerly-proprietary features for larger pools (which I do not have) and improved guest support for various OSes including Windows 8/Server 2012 among other changes.

At the same time, I started looking at switching domUs from Ubuntu—which worked great, by the way—to Fedora. This was purely due to personal preference, given my penchant for keeping software up-to-date even at the risk of instability, not any failings of Ubuntu.

The issue, of course, is that Fedora isn’t supported out of the box by XenServer or its management console XenCenter, and the wealth of knowledge out there typically pertains to older versions of Fedora and XenServer. Some IT firm even posted a tip to use the “Other install media” option for installing Fedora 20, which practically defeats the point of using Xen virtualization, since that creates a fully-virtualized guest (HVM) rather than a paravirtualized domU.

So I set out to update the existing methods of installing older versions of Fedora as a paravirtualized guest to the new release, Fedora 20 “Heisenbug”.

Credit where credit is due

I’m a sucker for giving credit to everyone and anyone, but in this case a few sources really formed the basis for what I’ve done:

Needless to say, both of these sources are super helpful, although none of them really work out of the box for what I’m doing.

The modified kickstart file

If you’re already experienced and you’re just looking for the kickstart, here it is. For installation instructions, see below.

I’ve created a GitHub repository for these, and I might add files for RHEL/CentOS 6.5 in the future, too.

Here’s the master-branch version: (if you’re adventurous, try the develop-branch version)

[github file=”/frederickding/xenserver-kickstart/blob/master/fedora-20/f20-server.ks”]

The master-branch files are typically tested, while the develop-branch files may introduce new features that are not yet fully vetted. (As the MIT License describes, everything is provided with no guarantees.)

The basic idea behind the post-installation script here is to create a legacy GRUB menu.lst file, which pygrub on XenServer can interpret to boot into a paravirtualized guest.

Update: now, the post-installation script doesn’t bother with a fake menu.lst at all, and instead makes GRUB2 configuration files. Based on reports that making slight alterations to the autogenerated GRUB2 grub.cfg file to make it compatible works, and based on the changes made to pygrub in upstream Xen (which have not yet been integrated into XenServer 6.2.0 SP1), I made the script tweak GRUB2 files and regenerate a grub.cfg with grub2-mkconfig. This should be robust enough to support future kernel updates!

How to use this kickstart (with screenshots!)

This procedure assumes that you’re familiar with XenCenter and have it running already. Continue reading “Installing Fedora 20 as a paravirtualized guest in XenServer with kickstart”

Spambots gone wild

On one of my sites running WordPress, Akismet (and other antispam plugins) is not installed. In some ways, it has served as a honeypot, revealing interesting tidbits about how spambots work.

Fascinatingly, there were several hundred of these comments, all identical to each other. They look like templates for comments to be generated by spam-producing software, except that the software never processed the templates and posted them verbatim instead:

Incoming college freshmen: Campus Backup Service is a ripoff

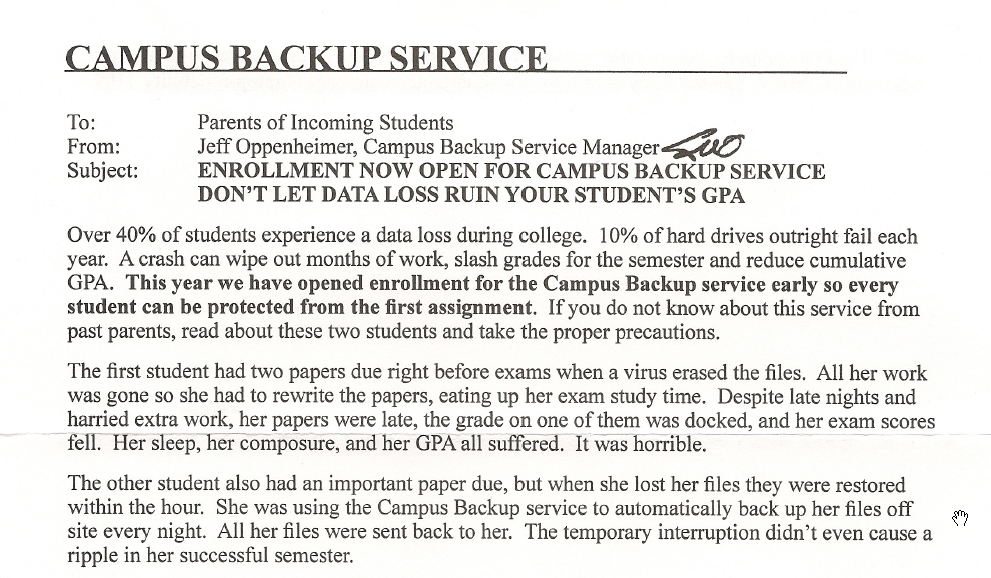
Campus Backup Service marketing letter

If you’re a freshman at Penn or many of the other universities that are raking in revenue from freshmen beyond tuition and fees, you may have received e-mails and letters offering all sorts of wonderful things. The one that caught my attention was something called “Campus Backup Service”.

It’s a cleverly marketed service that tries to leverage the anxiety of freshmen and parents to sell you something you don’t need — or rather, something you need, but not from this company.

Campus Backup Service marketing letter
They use the same scare tactics to market the service that are used by scammers. Don’t fall for it. Scan courtesy of Hannah C.

There’s a disaster scenario — a student without backup suffers a virus infection on her laptop and… “her sleep, her composure, and her GPA all suffered… it was horrible”. There’s an alternate scenario — someone uses this company’s service, and avoids the disaster.

Yes, college students need a convenient and viable form of backup, just as all computer users do, but not from this company. This is almost a scam (but not quite). (Notice how they target “parents of incoming students”, who might be less tech-savvy than college students?)

Vinay Dinesh and I are both Information Technology Advisor Managers (ITA Managers, for short) at the University of Pennsylvania, and we are writing, as individuals, to help you find the right backup solution, whether it’s as simple as copying files to an external hard drive, or syncing files to the cloud. But Campus Backup Service isn’t right. (See our upcoming collaborative post to see how you can back up your files the right way.)

Continue reading “Incoming college freshmen: Campus Backup Service is a ripoff”

How I organize my books

Barcode stickers as book tags

I keep all of my books organized in Librarian Pro by Koingo Software. Admittedly, the Windows port is a sort-of-slow version of the Mac software, but it’s usable and rather pretty.

Librarian Pro interface
The Librarian Pro software I use to catalogue books

Along with this, I use a USB barcode scanner to import items by their EAN/UPC barcodes. Librarian Pro connects to Amazon’s APIs and loads book metadata based on that barcode.

Laser barcode scanner
The operative end of a laser barcode scanner

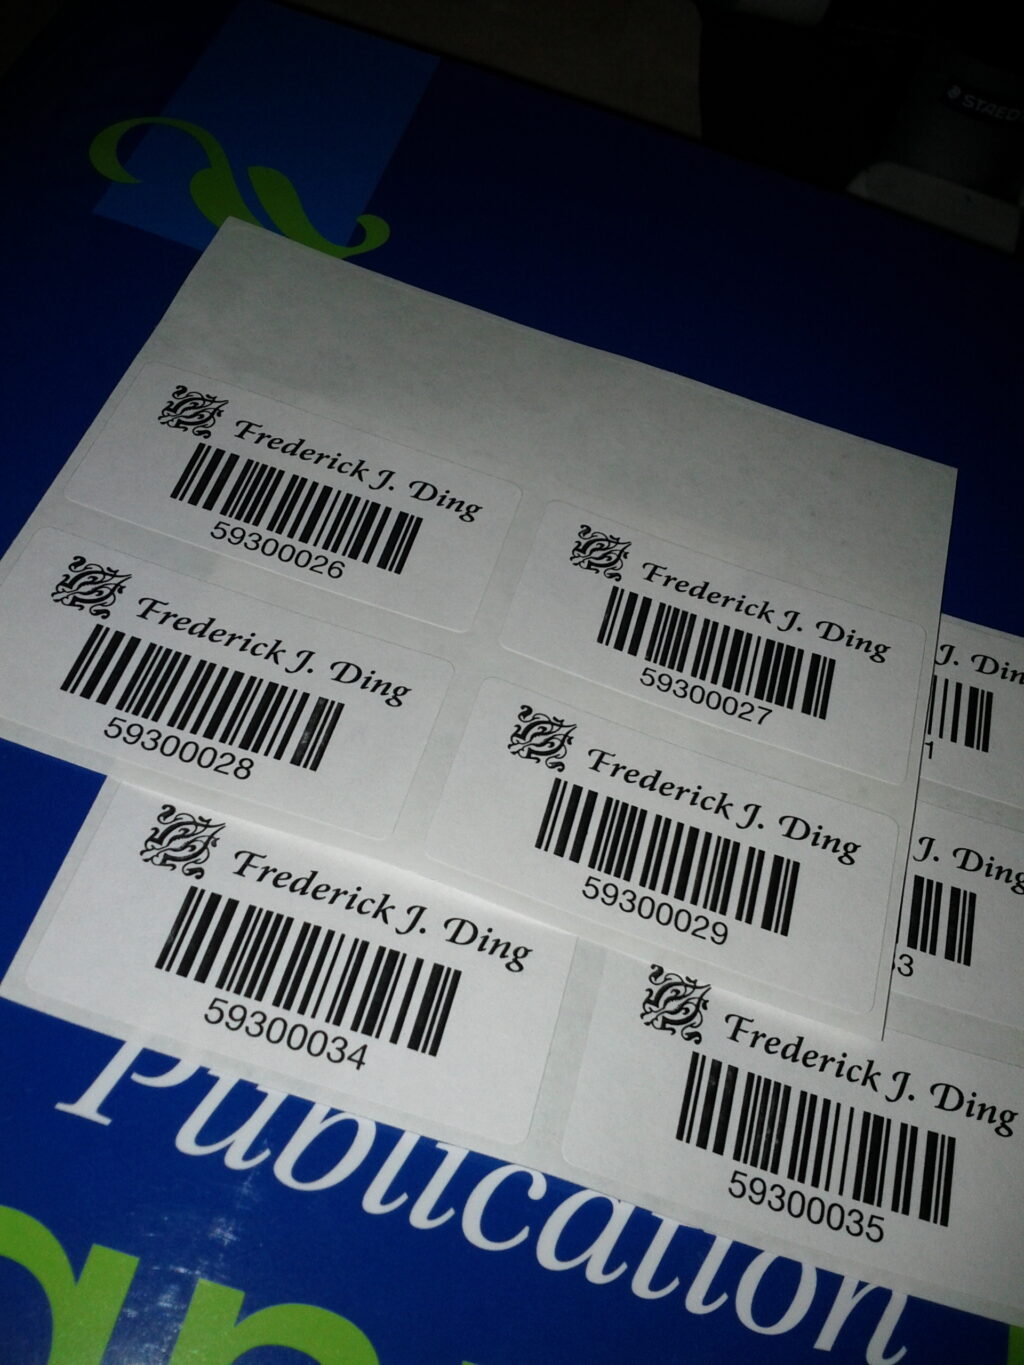
After importing a book, I make sure to tag it with a code of my own, specific to my collection. For that, I have these stickers:

Barcode stickers as book tags

And voila, an electronically-catalogued library of books awaits. It’s pretty easy to add location information to the metadata to help look for books, as well as generate HTML pages to show off or sell used books.